Installing WordPress is quick and easy with the Kiravo control panel. This step-by-step guide provides the fastest way to get your site online.
Installing WordPress on Kiravo control panel (Video + text tutorial)
We’ll cover the four essential steps:
- Log in to the Kiravo control panel.
- Install WordPress in just a few clicks.
- Point your domain name to our servers.
- Activate a free SSL certificate for security.
A Step-by-step guide to installing WordPress on Kiravo
1. Access Your Control Panel
First, you need to log into your client area to access the hosting panel. You can do that in 2 ways:
- via SSO in the client area
- directly on the control panel URL
The first method is to visit kiravo.net and click the Client Login button in the header menu. This will open the client area interface where you log in using the password you chose during signup.
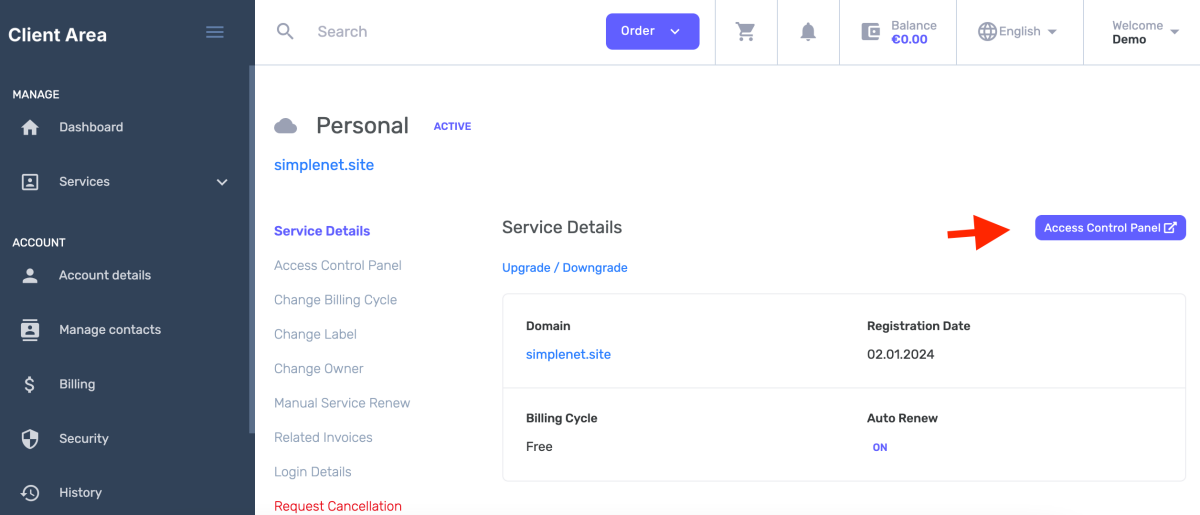
In the client area, navigate to the Services section and select your WordPress hosting service. Finally, click the Access Control Panel button to access the hosting control panel.
Alternatively, you can log in directly to the hosting control panel, without going through the client area. Just visit the control panel URL – webhostingpanel.app – and enter your email address and password.
2. Install the WordPress App
Now that you’re in the panel, it’s time to create your website.
- Click on Add Website.
- From the options presented, select Install an app. This allows you to automatically install popular applications like WordPress or WooCommerce.
- Choose WordPress from the list.
- Select a server location and the domain name. You’ll notice some locations have a green server icon. These servers are live and ready to go. Other locations are available on demand. If you need a specific location that isn’t green, just open a support ticket, and we can spin up a server for you in about 20 minutes.
- Enter the following details:
- Email Adress: Use a valid email adress.
- Username: Your desired WordPress admin username.
- Password: A strong password for your admin account. Be sure to copy this and save it securely in a password manager.
- Click Add.

And that’s it! In just a few moments, WordPress will be installed on your hosting account.
3. Connect your domain name to Kiravo
After the installation is complete, the panel will display the server’s IP address in the At a glance section. You need to use this IP to point your domain to our servers. The panel might also mention updating nameservers, but for most cases (especially if you manage your DNS elsewhere), updating the A record is the fastest method.
Here’s how to do it using Cloudflare as an example:
- Copy the IP address provided in your Kiravo control panel.
- Log in to your domain registrar or DNS provider (like Cloudflare, GoDaddy, Namecheap, etc.).
- Find the DNS management settings for your domain.
- Edit your
Arecord for the main domain (usually represented by@) and paste the IP address you copied from our panel. - Save the changes.
Important Note on DNS Propagation
After you update your DNS records, it can take anywhere from a few minutes to a few hours for the changes to “propagate” across the internet. During this time, the warning message in your Kiravo control panel will remain visible. Once the propagation is complete, the message will disappear and be replaced by a Visit site button.
You can check the propagation status using a tool like whatsmydns.net.
4. Install a free Let’s Encrypt SSL Certificate
Security is crucial. By default, we install a self-signed certificate, but for a live website, you need a valid SSL certificate from a trusted authority like Let’s Encrypt. This will enable the secure https protocol for your site.
You must wait for your domain’s DNS to fully propagate before attempting this step. If you try too soon, the process will fail.
- In your Kiravo panel, navigate to the Advanced section, then to Security tab for your website.
- You will see the default self-signed certificate listed. Click the three-dot menu icon next to it.
- Select Request Let’s Encrypt Certificate and click Request.
The system will now attempt to verify your domain and issue the certificate. If it fails with a timeout error, it simply means your DNS hasn’t propagated everywhere yet. Just wait another 10-20 minutes and try again.
Once successful, you will see the Let’s Encrypt certificate listed as active.
Forcing HTTPS
With your new SSL certificate installed, the final step is to ensure all visitors are automatically redirected to the secure version of your site.
- In the same Security section, find the Force Https option.
- Toggle it to the “on” position.
Congratulations! You now have a fully functional, secure WordPress website ready for you to build upon.
If you have any questions, don’t hesitate to contact our support team.
Leave a Reply